Linda Nagata: the blog at Hahví.net


Archive for the 'E-book How-to' Category

Kawaii-Kon: Writer Links

Saturday, March 16th, 2013

On March 15 I gave a presentation at Kawaii-Kon 2013, Honolulu’s annual anime and cosplay convention. My topic: From Initial Idea to Printed Book: One Path to Writing and Publishing a Sci-Fi Novel.

Rather wide-ranging, wasn’t it?

As a follow up, I’m publishing a list of links that might be helpful to someone getting started in writing and publishing. As with everything, use your own judgment and your mileage may vary. Your career is in your own hands. Take care of it.

Advice for writers & indie publishers:
Dean Wesley Smith
Kristine Kathryn Rusch
John Scalzi’s “Whatever”
Writer Beware (general info)
Writer Beware Blog
The Passive Voice
David Gaughran

Short story market listings
Duotrope — nominal fee
Ralan.com

Professional Freelance Editors I’ve used
Judith Tarr
Laura Anne Gilman

Example of a flat-rate book prep company
Lucky Bat Books (I have not done business with them, but have seen them recommended.)

Because you need to know
Striking a Pose: Women & Fantasy Covers
Pose-off, round 1
Pose-off with John Scalzi

Ebook prep
Sigil — code/edit your ebook
Calibre — convert your epub file to mobi

Where to get ISBNs (USA only)
Bowker

Where to sell your ebooks
Amazon
Barnes and Noble
Kobo Books
Smashwords (I don’t sell here, but a lot of writers do.)

Print-on-demand companies
Lightning Source (an Ingram company)
Createspace (an Amazon company)

Undone By A Curly Quote

Saturday, June 11th, 2011

Oh Nook Reader App for PC,

I don’t know if I should admire you or despise you.

It’s true there was an extra curly quote “}” at the end of the second style sheet in my epub file.

And I know it shouldn’t have been there.

But Kindle managed to overlook it and correctly parsed the book’s styles.

Sigil managed to overlook it and correctly parsed the book’s styles.

Calibre managed to overlook it and correctly parsed the book’s styles.

But you, Nook, have higher standards! You insisted on correct code and refused to parse the book’s styles until I spent half an hour tracking down your complaint.

I’ve decided: I both admire and despise you.

Ebook How-to: Table of Contents Tip #1

Sunday, April 24th, 2011

I decided to format the ebook I’m currently working on in a “flow through” style, without page breaks between the chapters. There’s just some blank space, followed by the name of the next chapter. It seems simple enough, but I discovered two challenges along the way.

(If you haven’t read my Ebook How To, I use Sigil to edit the epub file, and Calibre to convert the epub to mobi.)

Challenge #1: On my first pass I broke the book into several sections in my epub editor, Sigil. There were no page break codes at the end of these sections, nevertheless, when converting to mobi, Calibre inserted page breaks. I tried to turn this function off in Calibre, but didn’t manage to do it. Crude solution: I dumped all the text from the first to the last chapter into a single epub section. (I left the front and back matters in the usual separate sections.) I was lucky, because this is a fairly short novel of 65,000 words. At any rate, this eliminated the problem of unwanted page breaks.

Challenge #2: I’m not sure why I let this become a problem. I’ve done a lot of CSS and should have known better, but copy and paste got me in trouble. Here’s how:

When I create a new ebook, I copy some version of this code into the top of each chapter:

  <div class="chapterdiv">
    <h1 class="chapterline" id="heading_id_2" title="The Hunt">The Hunt</h1>
  </div>

The “chapterdiv” and “chapterline” classes let me define the formatting. The h1 element will be automatically picked up as part of the table of contents by Sigil’s TOC editor. The “title” in the h1 element is the text that will be displayed in the table of contents. The “id” is where I tripped up.

It’s a rule in CSS that all the IDs in a single document have to be unique–otherwise they’re not uniquely identifying a single element, and that’s their purpose.

Epub files are made up of many different documents. If you follow the usual scheme, each chapter will be in a separate document. In this case, it doesn’t matter if all the chapter headers get the same ID, i.e. “heading_id_2”. Since all the chapters are separate documents, the ID is unique in each document.

But when I dumped all the chapters into the same document, that ID suddenly wasn’t unique anymore. So when I converted the epub to mobi and sent it to my Kindle, the table of contents didn’t work. I would get sent to the last chapter, no matter what chapter I clicked on.

The fix was easy, once I realized what was going on. I went back to the epub file and used the search function to find each incident of “heading_id_2” and I incremented the number, giving me “heading_id_3”, “heading_id_4”, etc., all the way up to “heading_id_29”. Problem solved.

I’m posting this in case it’s helpful to anyone else who might run into the same problem.

What I haven’t figured out yet is how to link the cover into the table of contents. Using the h1 code above will cause “Cover” to appear in the TOC, but when I click on it in my Kindle, it tries to make a highlight, instead of taking me to the cover. If anyone knows the solution to this riddle, I’d love to hear it.

Old Novels into New: Overview & Links

Friday, November 26th, 2010

In fall 2010 I set out to convert my first four novels–published in the mid-1990s and long since out of print–into e-books. I started out knowing nothing about the process, but guided by some tips and hints I managed to convert all four books, and publish them to Amazon.

In the hope that others will find the knowledge helpful, I put together a series of blog posts covering the steps I followed. For convenience, I’ve rounded up the links to each post here:

Part 1: Starting steps & creating a cover.

Part 2: Preparing the manuscript.

Part 3: Converting to *.epub format.

Part 4: Formatting your e-book.

Part 5: Finishing your e-book.

The steps I discuss are only the process I used. It’s likely there are better ways–and if you know of one, please let me know, because I have more books to convert. Thanks!

Old Novels into New—Part 5

Friday, November 26th, 2010

Finally, the home stretch. Parts 1 – 4 discussed preparing your manuscript, converting it to epub format, and editing the resulting document. At this point, you should have a document that you can open in Sigil. It should be neatly divided into chapters that look nicely formatted in book view. The front and end pages should look like title pages, copyright pages, etc. Your new ISBN number should be on the copyright page.

The next step is to use Sigil’s tools menu to generate a table of contents, and to add meta data to the e-book record.

For the table of contents, I’ll just refer you to the manual.

The meta editor is also very nearly self-explanatory. Again, here’s the manual.

Once that’s done, save your work and close Sigil.

If your personal e-reader can read e-pub files, then go ahead and send it the e-pub file you just finished. Look it over. Note any errors or anything you don’t like and go back into Sigil and fix it.

If you have a Kindle, or another reader that doesn’t read epub files, there’s one more step. Remember Calibre? Open up Calibre again and import your edited epub file. Then do a conversion: epub→mobi. You can send the mobi file to your Kindle for inspection.

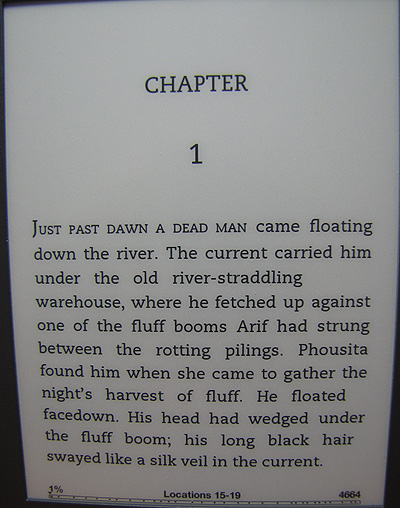
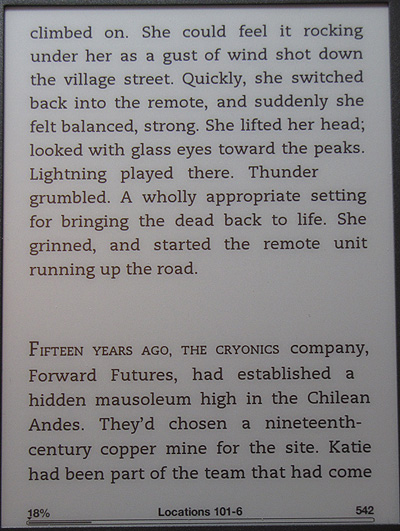
Here are two sample pages, shown on a Kindle:

Sample Chapter Opening

Sample Chapter Opening

Sample Section Break

Sample Section Break

If you haven’t already, set up your DTP account at Amazon, and publish.

As a last observation, Amazon will accept epub files for upload to the Kindle store, but the larger title fonts didn’t render quite the way I wanted them to, so I’ve been uploading the .mobi files instead, and they seem to work fine.

In conclusion, this is not the only way to create e-books, it’s probably not the best way, and it certainly doesn’t tell you everything you’ll need to know, but hopefully it will help set you on the path.

Let me know if any of this proves helpful. Suggestions and tips are entirely appreciated!

Old Novels into New—Part 4

Sunday, November 21st, 2010

So far I’ve talked about preparing your book cover, preparing your manuscript, and converting your Word doc into an epub file; and I’ve shown you a glimpse of the CSS code you get to work with this time, in Part 4 where we talk about editing your epub file.

At this time you should be at least a little bit familiar with HTML and CSS, through experience or through a tutorial.

Go into Sigil and open up the epub file created in Part 3. Look in the left hand column, find the style sheet (in the styles folder) and open that up.

Next, open up a chapter file. Chapter 1 is good to start. If you’re not already in code view, switch to code view by clicking the angle bracket icon at the top.

Now, open up the two files below. They will open in new tabs in Firefox, but probably in new windows in IE.

Sample chapter code

Enhanced style sheet

Look at the sample chapter code and compare it to yours. You’ll see some new style “classes.” Just for fun, go ahead and copy the code for the whole “chapterline_block” div into your own chapter file. Put it right under the body tag. Now switch to book view. You should see the word “chapter” in a big ugly font, and the number 8 in a small font.

Now look at the enhanced style sheet and compare it to yours. You’ll see lots of additional styles in the enhanced style sheet. Go ahead and copy the sections that define “div.chapterline_block,” “h1.chapterline,” and “p.chapternumber” into your stylesheet in Sigil. Paste them at the end of the file. Then look again at the chapter file. Did anything change? Hopefully, the chapter number is now nicely styled.

Feel free to change the styling to suit your needs and taste. Go ahead and experiment until you get something you like. Once you’re satisfied with the chapter opening you can copy and paste the code into all other chapters. Then you’ll just have to change the chapter numbers (and chapters titles of course, if you are using any).

I prefer to learn by looking at examples, so here are a couple other examples that might be useful when learning to style:

Sample “Part I” page

Sample about-author page

Fixing Stuff
Line spacing: If you started with a double spaced manuscript your lines will be too far apart. Fix this by adjusting the line-height parameter in all your “s” styles, in your style sheet. I use 18pt.

Excess code:
It’s not unusual to see stuff like this:

<body class="calibre">
  <div class="s1">
    <p class="calibre2">Chapter 8</p>
  </div>
  <div class="s1">
    <p class="calibre2"><span class="none1">In Lot</span><span class="none1"></span>
<span class="none1">s carnivorous-</span><span class="none1">plant collection there 
were</span> several sundews started from seeds that Netta had given him. The sundews were tiny. If Lot 
made a circle of his thumb and forefinger, each plant could fit within it. They had no stems, only thin petioles 
growing from a central bud, each petiole supporting a sticky paddle at its end.</p>
  </div>
  <div class="s2">
    <p class="calibre2">One....

Notice the ridiculous repetition of “span” tags? Logically, this shouldn’t matter, but for some reason only the text within the first span tag gets set in small caps, so I use a search and replace operation to get rid of the extra tags. I replace this–
</span><span class=”none1″>
with nothing, and replace
</span> <span class=”none1″>
with a space.

Here’s the cleaned up version:

<body class="calibre">
  <div class="chapterline_block">
    <h1 class="chapterline" id="heading_id_2" title="Chapter">Chapter</h1>
    <p class="chapternumber">8</p>
  </div>
  <div class="s1">
    <p class="calibre2"><span class="firstwords">In Lot's carnivorous-plant collection there 
were</span> several sundews started from seeds that Netta had given him. The sundews were tiny. If Lot 
made a circle of his thumb and forefinger, each plant could fit within it. They had no stems, only thin petioles 
growing from a central bud, each petiole supporting a sticky paddle at its end.</p>
  </div>
  <div class="s2">
    <p class="calibre2">One....

You might notice the same issue where italics are used. If the display works, you can probably leave it, but as I’ve mentioned before, I can’t stand messy code, so I use another search and replace to take out the extra span tags.

Here’s a lovely example:

<p class="calibre2">Abruptly, the camera bee lifted into the air. It hovered between Lot and Urban, 
its water-bead eye reflecting the dark, curving walls. <span class="none">How much do you know?</span> 
it demanded, in a tiny, tinny, feminine voice. <span class="none">Do you know 
why cold storage is empty?</span> <span class="none">No.</span> <span class="none">I 
can see not.</span> <span class="none">That shock on your faces.</span> <span class="none">Shao?
</span> <span class="none">Stop recording.</span> <span class="none">We have 
enough video to do the story.</span> <span class="none">Now I want to know why.
</span></p>

And here’s the cleaned up version:

<p class="calibre2">Abruptly, the camera bee lifted into the air. It hovered between Lot and Urban, 
its water-bead eye reflecting the dark, curving walls. <span class="none">How much do you 
know?</span> it demanded, in a tiny, tinny, feminine voice. <span class="none">Do you know 
why cold storage is empty? No. I can see not. That shock on your faces. Shao? Stop recording. We have 
enough video to do the story. Now I want to know why.</span></p>

Subscripts:
Do you ever use chemical formulas? O2 for example, or CO2? I do, on occasion. Calibre doesn’t seem to know what to do with subscripts. They have mark-up, but the style doesn’t do anything. The easiest thing is to modify the font size for their style so it’s much smaller than the default font size. I think I set it to 0.7em, but I forgot to include it in the stylesheet, so don’t look for it.

By the way, the default font size generated by Calibre is 1em. Don’t bother changing this. E-book readers allow the font size to be adjusted, so 1em is as good as anything else.

Once you figure out how to code chapter 1, use the same process for the rest of the chapters.

You’ll also need to set up the title page, copyright page, etc.

And of course you are periodically saving your work, right? And making back ups at the end of the day? Of course you are.

For further reading, here’s the Sigil manual.

Next time: Part 5—finishing your e-book.

Old Novels into New—Part 3

Wednesday, November 17th, 2010

Converting my old novels into e-books has proved to be an interesting process. I’m writing a fairly detailed account of the steps I took in the hope that the information will be of some use to other writers who are contemplating doing the same.

Part 1 of this series covered steps 1 & 2 of the process by mentioning rights, the option of creating a publishing company, and acquiring your ISBN number. It then went into more detail on step 3, creating a cover. Part 2 discussed the fourth step, preparing the manuscript. Today we move to step 5: converting your perfect-as-possible Word document to *.epub format, and cleaning up the result.

Just to let you know, I haven’t done any comparative studies, and I don’t know if the way I’ve done this can be easily bested or not. Basically, I found a way that worked “well enough” and didn’t spend any more time looking for a better process. So let me know if you find a better way—I still have a few more manuscripts to deal with!

Stage 1:
Following suggestions from other writers, I acquired a program called Calibre by Kovid Goyal. It’s described as an e-book manager, but for our purposes its value comes in converting a Word doc into an epub file. The process is simple. First, use Word to re-save the file as *.rtf. In my experience, all the formatting is preserved. Next, import the *.rtf file into Calibre using the “add books” button. (Of course you are backing up your precious files at every step of this process, right?) Once the file has been imported, click the convert button. Select .rtf→.epub, upload the cover, and click “go.” The process takes a minute or so on my rather slow laptop.

And that’s all we need Calibre to do–for now, anyway.

Being rather fussy by nature, I copy the epub file from the Calibre library (located in the user folder) and paste it into a folder for the book I’m working on.

Stage 2:
Again following suggestions from other writers, I acquired a program called Sigil which is an e-book editor. Open up your epub file in Sigil. What you see will look a lot like the screenshot you’ll see if you click the Sigil link I just gave you. Your epub file will be revealed to have many sub-files, hopefully broken up by chapters, all of which are listed in the left column. “Cover” always seems to be the first file (don’t stress if your cover looks horribly distorted). All the other files will have long confusing names.

Tip: Right click and select “rename” to rename files. Double clicking doesn’t work.

Take another look at that screenshot. See the open book icon at the top? See the angle bracket icon close to it? Those are used to switch between code view and book view. Try them out. They are very important. It’s also good to know about that strange, script icon “Ch” second from the right—that’s used to split an existing file. You’ll need that on the rare occasion when the split wasn’t done right by Calibre.

So, back to the cover:
Switch to code view. I don’t know what the SVG tag means, but I learned to replace the generated code with this: (my cover images are 600x800px; yours may be different)

<body>
<div>
<svg xmlns="http://www.w3.org/2000/svg" xmlns:xlink="http://www.w3.org/1999/xlink" height="100%"
 preserveAspectRatio="xMidYMid meet" version="1.1" viewBox="0 0 600 800" width="100%">
<image height="800" width="600" xlink:href="../Images/cover.jpeg"></image>
</svg>
</div>
</body>

Don’t be afraid to adjust your code. You can always start over if it doesn’t work out. Switch back to book view to see if the changes work.

Open up one of the chapters:
If you included copyright pages and such, skip past those for now and open up a file containing a chapter. Does the file start at the beginning of the chapter? Does it end at the end of a chapter? I never had any problem with this, but if you do, you’ll need to fix it.

Assuming everything is fine, look at the chapter in book-view. How does it look? Don’t worry that the lines fill in the whole window and there’s no right or left margin. There will be on the e-book. Look instead at the line-spacing, the paragraph indentation, whether or not your first paragraph and first words are doing what you want them to. Does the chapter number look okay? Probably not. Either that, or you need to be a lot fussier.

It’s likely you’ll want to make some changes.

Look again at the left hand list. Find the “styles” folder and open it. Doubleclick on the stylesheet inside that folder to open it up.

Does what you see horrify you? If so, you’ve probably never worked with HTML and CSS code before. I worked in website development for years, so when I started using Sigil I was like the little girl in Jurassic Park when she sits down at the computer and says, “Oh this is Unix. I know Unix.” Well, I don’t know Unix, but I know how to do HTML and use CSS, so from this point everything fell into place for me. If you haven’t worked with CSS before, go now and find a nice, simple tutorial. CSS is highly detailed, but not horribly complicated for what you will need to do.

Next time, Part 4: Editing your epub file.

Old Novels into New—Part 2

Monday, November 8th, 2010

This is the second installment describing how I converted my old novels into e-books. I’m hoping this information will help other writers interested in doing the same. Part one of this series mentioned (step 1) rights and (step 2) creating a publishing company, and went into more detail on (step 3) creating a cover.

Today we move onto step 4, preparing the manuscript.

Over the years I’ve made an effort to convert my novel and short story files into modern Word format, and about three years ago I did some major clean up work on the old files, so I was in a pretty good position when I started this project.

Styles are really, really important to the process. Make sure you are properly using styles in your manuscript and the conversion will be much easier. For example, all the text in my manuscripts goes under a custom “manuscript” style, which uses Times New Roman 12pt with a first line indent of .5 inches and double line spacing. You’ll want to change the actual styling later. The important thing is that the text has a consistent style. So to start, I use “manuscript,” “manuscript + italic,” and “manuscript + underline” (until I get rid of the underlines).

Stage 1:
I start with a Word document containing the entire novel, and inflict upon it a series of search & replace operations. I’ll list some of them, though it’s likely I’ve missed a few:

1. convert double hyphens to em-dash’s. There should be no white space around the emdash.

2. convert Word ellipses to periods with a space in-between each. Best to consult a style manual for the details, because there are details.

3. In the old days it was two spaces at the end of a sentence. These days it’s one space. I don’t know if this matters with an ebook, but I like to search & replace two spaces with one.

4. Fix up the line breaks. I continue to use a centered # sign to mark them because this makes it easier later.

5. If you don’t have curly quotes, convert them. I finally found the easy way to do this. Set up Word to automatically convert to curly quotes as you type. Then just search and replace double quotes with double quotes and single quotes with single quotes. Test first, but if all goes well, “Replace All” makes short work of it.

6. Convert underlines to italics. Search & replace does this too; you can search & replace using format only. Caution: for me, if an entire paragraph was set in underline, it would fail to convert to italic, so I had to fix these during a later stage.

7. Look for any other weirdnesses left over from old files (odd tabs, extra spaces, weird alignments, etc.) and clean them up.

Stage 2:
Next, I start setting up some additional styles.

1. Create a style for your chapter number. Name it “chapterline” or some such; just make it different from anything else. Simplest is to base it on the “manuscript” style but remove the indent.

2. Create a style for the first paragraph in your chapter. I call it “firstparagraph.” Again, based on “manuscript” but without the indent. I use this same style for the first paragraph after a section break.

3. I like to set off the first words in the first paragraph of a chapter and the first paragraph after a line break, so I set them in small caps. If you want to bother with this, then create a style for it. Let’s call the style “firstwords.”

4. Create a style called “sectionbreak.” I just set it to center text without an indent, but the important point is that you want the style mark-up so you can use it later.

Now go through the manuscript and apply the new styles throughout. It’s easiest to search for all chapters first—apply “chapterline,” “firstparagraph,” and “firstwords.” Then search for your section breaks (presumably marked with a # sign), and style the break, the first paragraph after it, and the first words.

Stage 3:
Your publishing company sent you the “foul” manuscript, right? You know, the copy of the manuscript with all the copy editor mark-up, and printer notes and such? And you kept it, right? Get that out now. Go through it page by page and add all those corrections into your Word file. If you have the same issue I have with underlined paragraphs not automatically converting to italics, now is the time to correct the problem.

Next—did you make changes in the page proofs? If you’ve got a record of those changes, load those in as well. If not, well, your e-book won’t be quite the same as the old hard copy.

Stage 4:
Prepare the front and end pages. I use a title page, a copyright page, a dedication page, and maybe an acknowledgment. At the end I have a “Books by” and “About the author.”

I suppose you can format them in Word, but you’ll wind up with a lot of styles. For my own, I just put these pages in a vanilla format, and fix it later.

And at this point, your manuscript is ready for conversion!

Next time, Step 5: converting the Word doc into *.epub format.

Old Novels into New—Part 1

Saturday, November 6th, 2010

My first four novels were published in the 1990s. They went out of print in short order, and the rights reverted to me long ago. Now I’m putting them out into the world again, this time as e-books.

At this writing, Tech-Heaven and The Bohr Maker are already up on Amazon.com and available in Kindle format. Deception Well should follow in the next few days, and Vast within a week or two. After that I’ll work on getting them up on iTunes, and B&N if possible.

I thought I’d share some of the process I used, in case there are other writers out there who might find it useful. If you know a better way to do this, let me know! Same if you read any of my books—please let me know how the formatting holds up for you.

Step 1— Obvious, but worth mentioning: make sure you’ve got the rights back!

Step 2— Decide who’s going to publish them. For myself, I wanted a publishing company, and since I have some other projects in mind I set up an LLC, which is relatively easy to do in the state of Hawaii. My publishing company is called Mythic Island Press LLC.

Update:
Step 2a— You’ll need to purchase an ISBN number, or package of them if you have more than one book. I’ve read that an ISBN isn’t needed, but personally, I wouldn’t think of publishing without them. You cannot re-use the ISBN from your original publication. There will be a specific agency selling ISBNs depending on what country you’re in. Google it.
End update

Step 3—The cover.
This is the step that held me up for a long time. Yes, it’s an e-book and doesn’t really have a cover, but you need a picture to sell it online, so you need a cover. I looked at a few options, but in the end I did the covers myself.

I had a design theme in mind, to tie all four books together. I’m not really interested in covers that illustrate a scene from the book and I certainly don’t have the skill to create something like that anyway. So I set out to find images that illustrated the books in an abstract way.

It took a few days of exploring stock photo websites, but I ultimately purchased pictures from Veer.com, iStock.com, and canStock.com. I also had access to a beautiful galaxy photo by my daughter, which served as the background for all four covers.

Using Photoshop, I put together high-resolution files that will work for trade-size books, if I ever decide to print them. For the ebooks, I then created *.jpg versions at a web resolution of 72 pixels, and a size of 600×800 pixels.

For better or worse, my covers are pretty different from what’s usually seen in the genre. Here they are:

Cover: Tech-Heaven, 2010-version

Cover: Tech-Heaven, 2010-version

Cover: The Bohr Maker, 2010-version

Cover: The Bohr Maker, 2010-version

Cover: Deception Well, 2010-version

Cover: Deception Well, 2010-version

Cover: Vast, 2010-version

Cover: Vast, 2010-version

You might have noticed they all have a subtitle: “Book X of the Nanotech Succession.” That’s a new invention. The books are not a series but they all share the same story world, so I decided to wrap them up as a set, and numbered them according to their place on the timeline, rather than by publishing order.

Next time—Step 4: preparing the manuscript.